Showing posts with label Semester 1. Show all posts

Sunday, July 24, 2016

[DStudio1] Project 3: Dreamspace for the User 'Space for the Self'

For the final project, we were asked to design a 'Hideout' for ourselves. This is an individual project. Using the knowledge we've learnt from the previous projects and applying on the final project. We are required to design a space for the self by attaching it to the walls/surfaces of an imagined 'city' in an empty abandoned lot between two buildings. The space is to fit a specific use (as a dream space: for viewing, space for contemplating, space for self-exploration, space for exercising, space for dreaming, space showcasing and so to speak a dream space for the user).

The understanding is to be architecturally translated into a series of connected spaces (2-3 spaces) that successfully establishes the quality and articulation of the interior and of exterior design. Concept shall evidently show the experiential and spatial quality. We are also required to consider on both the physical and non-physical requirements of the self.

There would be 3 stages for this project:
Task 1: Narrative writing on discovering your personality, or even based in the persona, life scenario story and journey of the user from where the theme of the hideout can be extracted.
Task 2: Organizing the 2-3 spaces which encompasses the design principle in spatial relationships and organization. The spaces can be explored through hierarchal arrangement by its meaning, significance, importance and also capturing more on the essence of the narrative. It should be explored in the sense of the spaces as well.
Task 3: Exploration of materiality. By generating and exploring the ideas and concept from the narrative and spatial exploration, notions and experiential effects of materials and the sense in the final design should also be considered.


Objectives of Project
The objectives of this assignment are as follows:

  1. To further the students ability to create and develop a conceptual narrative.
  2. To introduce and create awareness in understanding the dimensional requirements of the human body (anthropometrics and ergonomics).
  3. To explore and apply basic design principles and terminologies.
  4. To be able to consider objective and subjective parameters in the design process to create a space this is practical yet poetic. 
  5. To explore how the selection and application of materials in relation to the sensory experience of space. 
  6. To be able to select and make different study models (sketch, concept, diagram, section and development models).

Learning Outcomes of this Project
  1. Generate design concepts through the process of exploring carious sources and abstracting ideas. 
  2. Identify key architectural design elements and principles with the ability to discern how they inform space and form. 
  3. Relate the idea of the individual 'self' and the body' to space and its experiential qualities. 
  4. Articulate and apply architectural design elements, principles and materials to create an architectural composition that demonstrates place-making. 
  5. Utilize a process-oriented approach involving sketching and model-making as tools for generating and developing design ideas. 
  6. Produce legible orthogonal drawings and architectural models to visualize and communicate final design. 


Attached below are my final presentation boards and model: 

Me at my presentation station.
Presentation Board 1

Presentation Board 2

Presentation Board 3
Front Elevation

Balcony space and stairs to the top balcony.

Standing view from the top balcony.

Side Elevation

Interior view of the 'Understand' space (Space 2)

The 'In-depth thinking' space (Space 1)

Without the building walls. 


Top View showing the interior from plan view.

Rear Elevation

Showing the sitting area and built-in shelves on the building's wall.

Reflection
This is counted as a big final project as an individual one. External accessors were also there to grade our works and I find it amusing where we get to have this kind of first time exposure as well. This project allows me to enhance my design thru a narrative or story which we would like to portray. It also taught me that in every design there could be a deep meaning behind it. Although design doesn't come quick and some sleep has to be sacrificed but overall, I love my design and look forward for more. Perhaps I could also improve some of my workmanship as well. 


[DStudio1] Project 2: Self Expression through Architectural Space 'Furnitecture'

For the second project for design studio, it is a group project consisting of 6-8 members. We are supposed to construct a Furnitecture (Furniture + Architecture) for a certain user chosen among the group.

The group members are:
  1. Heng Rui Ying (myself)
  2. Lee Kylie
  3. Aaron Chong Yu Ho
  4. Chloe Teh 
  5. Premdyl Singh Shadan
  6. Phares 
  7. Heng Sy Hua

The main aim for this Project is to expand the interpretation of the self (or multiple self) by exploring the relationships between human body and designed form. The user will define the intention of the space and its form based on their personality and human body. We will also be introduced to basic design principles such as rudimentary ways in which to order and organize spaces and forms. Also, developing an understanding of scale and proportion in relationship with body and space. 

We will have to translate the user's personality and design intentions thru designing 'Furnitecture' that transforms to architecture using cardboard and cardboard fittings and assemblies. The cardboard furniture must be highly functional and usable. 


Objectives of Project
The objectives of this assignment are as follows:
  1. To further the student's concern about elementary user needs. 
  2. To introduce and create an awareness of the scale and proportion of the human body. 
  3. To create how human anthropometry and ergonomics relate to shape and the space. 
  4. To introduce the role of human behaviour in shaping the space and dictating activities. 
  5. To introduce basic design principles and terminologies on deciding spatial and form configuration. 
  6. To create and work on full scale installation in order to further visualize efficiency, functionality, quality of space and articulation form. 

Learning Outcomes of this Project
  1. Generate design concepts through the process of exploring various sources and abstracting ideas. 
  2. Identifying key architectural design elements and principles with the ability to discern how they inform space and form. 
  3. Relate the idea of the individual 'self' and the body to space and its experiential qualities. 
  4. Utilize process-oriented approach involving sketching and model-making as tools for generating developing design ideas. 


Our Furnitecture
Front view 
Side view: Plug and pull shelf

Rear view

Side view: Pentagonal shade


Board 1
Board 2
Board 3
Board 4
Board 5

 Check out the slide show our sketches, study models and also the making process.


Reflection
It was our first group project for design studio. A lot of teamwork is needed in this group work as we are constructing a one to one scale model. A lot of things also has to be taken into consideration as we are only allowed to use cardboard as the material. There are also problems after problems that we encounter but we manage to overcome it and get it done with our project. It was a fun, tiring and also an interesting semester 1 experience.


Saturday, July 23, 2016

[DStudio1] Project 1: Self-Expression through Object 'Representing Me'

For our first project for design studio, we were given the task to explore our creativity by making a mask, headgear or glove which represents ourselves in design. It was an ice breaking exercise. Before even entering into designing buildings, we were asked to explore in design.


Objectives of Project
The objectives of this assignment are as follows:
  1. To explore different possibilities of generating ideas thorough rigorous design processes. 
  2. To explore various approaches in translating ideas and abstracting translation and interpretation. 
  3. To explore varied forms of artwork in communication and expression of self and its sense. 
  4. To enhance ability not only in sketching but in crafting three dimensional design or art form. 

Learning Outcomes of this Project
  1. Generate design concepts through the process of exploring various sources and abstracting ideas. 
  2. Identify key architectural design elements and principles with the ability to discern how they inform space and form. 
  3. Utilize a process-oriented approach involving sketching and model-making as tools for generating and developing design ideas. 


To start of this project, we were given the task to use words or narratives to describe our 'self'. Next would be generating ideas with sketches of how would we want the form of ourself to look like by using the Design Principles and Elements as a guideline (The design has to be in abstract form). With the help of the tutors, we were able to improve our design with the help of the comments given as well as some feedbacks from peers in tutorial class. Next would be the selection of form. I chose headgear as my form as it represents my quality and self well. Lastly, it would be the selection and application of materials in the design. 

My Board 

Front View

Side View (Left)

Rear View

Side View (Right)

A slideshow on the making process.


Reflection
This project was a tough one. From not a design based background, I find it quite difficult to understand what actually design is and it is not that simple. Design can be anything, I am still in the process of learning and I will do my best in the future. However, from this project I get to explore deeply on my personality and characteristics which was also a tough task. Overall, it was an interesting start off. The day of presentation itself was fun, you get to see people with their own designs and also walking on a runway presenting ourselves.


Sunday, July 17, 2016

[DComm] Project 2C: Perspectives

The last part of Project 2. We are required to do Perspective drawings for Cooper House. (1) Two-point perspective showing an interesting external view of the building of your choice and (1) 1-point perspective showing the interior of the building.


Objectives of Project
This assessment introduces perspective as a mode of communication in architecture. You are required to construct firstly, one exterior (two-point) perspective followed by one sectional interior perspective (one-point).

In constructing both these perspectives, you are to demonstrate the ability to express spatial idea in 3-D form, understanding of 2-D and 3-D relationships in architectural graphics, skills in drawing and composition, creativity and complexity of drawing. Also, your selection of space and exterior form is significant.

Learning Outcomes of this Project
  1. Ability to express spatial ideas and architectural detail in three-dimension, in the format of one-point and two-point perspectives. 
  2. Understanding of what perspectives (and its different types) are, how to generate them and how to apply them to the design process and presentation. 
  3. Ability to produce legible architectural drawings with strong creative intent. 


Perspectives can be drawn from plans and sections. At first, it was really confusing where there are a lot of new terms. Such as, standing point, ground line, horizontal line and others. But after starting to understanding what it means and trying to draw it out myself, it starts to get a little easier. It may be confusing at first and frustrating but after trying. Eventually, I was getting the hand of it and I manage to finish up my perspective drawings. The sectional interior perspective was quite a challenge as we have to draw the interior part of the building as well. 

Attached are my 2-point exterior perspective and 1-point sectional interior perspective. 

Exterior: 2-Point Perspective


Sectional Interior: 1-Point Perspective

Reflection
From this project, I've learnt how to draw perspective drawings (not free-hand). The outcome turns out to be good, it really has that perspective view. The challenge is that sometimes the drawing just doesn't seem right and I have quite some hard time figuring it out. But overall, I've learnt a lot from this project as well. Now, I can draw perspectives from plans and sections! 


[DComm] Project 2B: Axonometric Projection

Continuing with the same building, Cooper House by Gwathmey Siegel. For this project, we are required to do an axonometric projection. Axonometric drawing is an excellent method of communicating and expressing an architectural idea.

Objectives of Project
In the production of the work for Orthographic Projections assessment, you would have, by now, a fairly in-depth understanding of the architectural details and spatial value of a building (which will introduce to you by your lecturer).

In the next exercise, you will learn how to execute an axonometric projection by generating an exploded axonometric of the house.

These projections will be generated at a scale of 1:100 on butter paper (for construction) and finally inked on A1-sized tracing paper.

Learning Outcomes of this Project

  1. Ability to express spatial ideas and architectural detail in three-dimension, in the format of an axonometric projection. 
  2. Understanding of what axonometric projections are, how to generate them and how to apply them to the design process and presentation. 
  3. Ability to produce legible architectural drawings. 


We can draw our axonometric projections from the plan that was drawn in the previous project. By using the plans, we can extend it to the height of the building giving 3D shape of the building in drawing. With the use of line weights, we are also thought about profile lines to show the whether an object is attached to one another or not. 

The picture below is my Axonometric Projection for Cooper House. 

Axonometric Projection

Reflection
This project taught me how to draw axonometric projections and also showed that how axonometric can show the details of a building in 3-Dimension. It is an interesting project where I get to understand the building more as I see from the axonometric drawing. I could also apply this in my other drawings in the future to show the interesting parts of the building. 


[DComm] Project 2A: Orthographic Projections

For our second project, we are now getting almost into the technical drawing part. The orthographic projections we are required to do consists of plans, sections and elevations. There are 2 parts for this project, PART 1 and PART 2.


Objectives of Project
You are to utilize the given images of a furniture (for Part 1) and a building (for Part 2) to be drawn up. By using the skills demonstrated and explained in the workshops draw up the following required orthographic drawings.

Learning Outcomes of this Project
  1. Demonstrate drafting skills in modern and traditional methods of architectural drawing. 
  2. Record and present clear and legible architectural information manually.
  3. Identify and apply architectural conventions and symbols.
  4. Demonstrate in pencil and ink examples of:
    • Line types
    • Line weights
    • Line quality
    • Hand lettering


For PART 1, we have to draw an orthographic projection of our drafting table as a kick start. This allows us to get the hang of understanding how line weights work in our drawings. We measured all the measurements needed of the drafting table to construct our plans, sections and elevations. Before hand, we were required to draw a draft on butter paper using pencils and then later inking it on tracing paper using technical pens.

Requirements for Part 1:
  • Top view
  • At least two selected side views
  • At least one section

The following attached are my orthographic drawing of the drafting table.

Orthographic Drawing of Drafting Table


For PART 2, we were all given a building. The building we were given was Cooper House by Gwathmey Siegel. Before starting on the drawings, we were required to search on for more further informations on the buildings, pictures or plans that can be found. Next, we were required to do a study model of the building so that we get to understand more and have a good glance at how the building would look like. With the use of study model, it gives us a good visualisation and also helps us in our orthographic drawings later on.

Cooper House by Gwathmey Siegel

My study model: Cooper House

The same steps before heading for the inking part. We are required to draw a draft with pencil on butter paper first and then ink on tracing paper. Both the butter paper and tracing paper should be handed in during submission. 

Requirements for Part 2:
  • Floor plans
  • Front, back and both (left &right) side elevations of the given building
  • 2 x cross-section view of the building showing floor and roof construction

The following are my orthographic drawings for Cooper House. 

Floor Plans

Elevations

Section

Reflections
My first orthographic drawings done! I have definitely learnt a lot from these projects. I know how to use technical pens and also differentiating how line weights can be used (eg: the one closer to us uses a thicker line weight, whereas the on further to us uses a lighter line weight). A lot of patience and tedious works needed to be done but the outcome would be very satisfying. Overall, it was a fun project and I have learnt so much about line weights,symbols that I need to include in my orthographic drawings and also other techniques as well. It's not perfect yet but there are still many more to learn. 


[DComm] Project 1: On-site Sketching and Tonal Values

Our first project for Design Communication is sketching. It's a start off warm up exercise for us newcomers as architecture students. For this project we were brought to several places on campus by our respective tutor for our on-site sketching sessions. 


Objectives & Learning Outcomes of This Project
The objectives of this project are as follows:
  • To understand the notion of space in architecture
  • To develop skills in visualizing of space through observation and perception of a given site
  • To develop skills in sketching as a mode of communication
  • To understand the notion detailing's in architecture and objects
  • To develop skills in communicating the above in various tonal and depth values
  • To develop various techniques of hatching through different medium

For our sketches we are needed to capture / emphasize on several aspects of the built environment within the site to demonstrate our understanding of space:
  • Solids and voids: Form, Skin, Structure
  • Opening/ Aperture; openness/enclosure; inside/outside; light/shadow
  • Rhythm in architecture
  • Details
  • Textural effects/ Materials
  • Landscape/ Setting
  • Scale and proportion (Relation to human and other surrounding built environment)

We are encouraged to use pencil as the medium and also using a range of hatching types including stippling, cross-hatching, one directional (hatching) and scribbling. We are required to do 19 (15+4) sketches on our sketch book and choose the best 4 sketches. Requirements are that the best 4 sketches has to be places around the campus. 

Below are my best 4 sketched that I've chosen:

Sketch 1: Library

Sketch 2: Lakeside View

Sketch 3: Block E, Level 3, Studio Corridor

Sketch 4: Block C, D and E

Reflection
This project had been quite a challenge for me. With zero knowledge of knowing how to draw perspectives and how to sketch. It was my first time doing so, it was frustrating at times that my drawings sometimes doesn't seem to make any sense but with practice, I manage to improve somehow. Also, with the help from my tutor and friends I've learnt a lot. Thank you to everyone who have guided me throughout this project. 


Saturday, July 16, 2016

[BMat] Project 2: "Materiality of SPACE: An Experiential Exploration"

For our second and also our last project. Also a group project but some parts individual as well. 25% Group work and 15% Individual. This time in groups of 5-6 we are required to select a building which has a fun and creative space that allows us to experience and explore most of the building materials covered in the module we've learnt. The buildings cover can be either shop lots, government/ private buildings or even galleries. But since this would be a project involving visiting the building itself therefore we also have to request permission from the building owner for us to conduct our case studies. The cafe we chose was VCR Cafe, located at Jalan Galloway at the central of KL.

VCR Cafe

The group members are:
  1. Heng Rui Ying (myself)
  2. Nurul Shahira bt. Muhd. Ali Kuan
  3. Seow Koji Takehira
  4. Lim Siew Ni
  5. Lee Kylie
  6. Aaron Chong Yu Ho


Objectives of Project
The objectives of this assignment are as follows:
  1. To introduce various types of building materials which are being used in the construction practices.
  2. To create an understanding of the choices designers make in choosing the building materials based on the properties. 
  3. To further understand the physical and chemical properties of the building materials being used in existing buildings/ spaces. 
  4. To expose students to standard construction names and terminologies for materials in a building/space. 

Learning Outcomes of this Project
Upon completion of this assignment, students will be able to:
  1. Produce a complete documentation and analysis of materials in respect to physical and chemical properties. 
  2. Identify the various types of building materials (finished and structural)
  3. Understand the effects of building materials on aesthetics and structural qualities of a space of building. 
  4. Understand and appropriateness of material used in context of several factors such as occupancy, concept and climate. 
  5. Acquire analytical skill in understanding selection of building materials for a building/ design. 
  6. Understand the application/ installation of material as finished and structural materials (simple construction)


There will be two Tasks for this project. TASK (A) would be a GROUP work and TASK (B) would be an INDIVIDUAL work. 

For TASK (A): GROUP,  we are required to do two A2 boards in landscape orientation and also a mood board. The boards should consist of a brief introduction of the selected building & reason for selecting the space. Also, the identifications of materials in plans, sections and elevations to show where the materials were used. A minimum of 15 types of materials. The information on the application of materials also needs to be included such as it's physical, chemical properties, suitability of material in context to concept, occupancy and climate. The mood board should also include color, patterns and photographs and informative design elements to show the spaces without using any words and descriptions.

For TASK (B): INDIVIDUAL, one A2 board each student and also in landscape orientation. Each of the members are required to do one board showing the sense of materiality. We were given each a space in the building we have chosen. My space of the building would be the balcony. For this individual work we are required to analysis the material used and also the space. 
We are required to consider these requirements:
  • Design Intention & Concept: How that has influenced selection of materials?
  • Space Analysis: Experience within the space. How the material selection and its application within the space affect users' experience? (Scale, proportion, installation)
  • Include diagrams to support your analysis (Sketches, photographs etc.)


Attached are the final presentation boards:

Group Board 1

Group Board 2

Mood Board

Individual Board: Balcony Space

Reflection
In this project, we were given a slightly bigger group to work with. It was a fun journey with them, we get to gather around and head to the same place for our case studies. Having group meetings every week as well to catch up on each other's work. Besides, we get to learn more about many other materials that were used in the building. Not only seeing from pictures but also with the sense of touch, this time we were able to experience it ourselves by being in the space itself. Being able to experience the sense of being in that space actually allows me to feel how the material actually plays a role in the design rather than a plain concrete wall. I'm eager to head out for more site-seeing activities in the future! 


[BMat] Project 1: Classification of Building Materials

For our first project for Building Materials, it is a group work which consists of 3 people per group. The weightage for this assignment would be 30%. In this project, we were given the choice to choose a certain building which uses 3 types of materials from the list given in the brief which is Bricks, Stones, Concrete and Glass (compulsory). Since glass is compulsory, we are required to select 2 other materials among the 3.

The members in the group are:
1. Heng Rui Ying (myself)
2. Nurul Shahira bt. Muhd. Ali Kuan
3. Seow Koji Takehira


Objectives of Project
The task of this project is to select and architect and their building that utilizes several types of building materials, namely stones, concrete, brick and glass. The students are required to analyze the materials that are used by the Architect fot the building that is chosen and produce a presentation board that explains the characters of the building materials and how these materials relate with the surrounding context.

Learning Outcomes of this Project
Upon completion of this assignment, students will be able to:
  1. Recognize how intrinsic forms, limitations and boundaries of a material become factors in design considerations. 
  2. Effectively work with a material in line with design requirements. 
  3. Be able to express a material within its contextual application (solid and transparency)
  4. Be able to recognize elements of modularity, symmetry and asymmetry in the materials applies on the buildings. 

The building be and my members chose was Shulman Home and Studio by Lorcan O' Herlihy Architects

Shulman Home and Studio by LOHA located at Los Angeles, CA, USA.

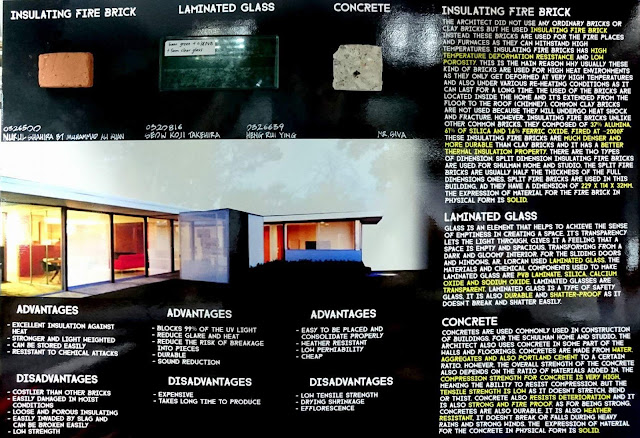
The buildings materials used widely were glass, concrete and brick which fulfilled the requirements of the brief for this project. With the help of teamwork, we manage to compile the informations needed to fill in the board such as the advantages, disadvantages, characteristics and also the expression of the materials. We were also required to compile informations on the architect and building's background as well. I did the part of compiling the architect's information. 

Each of us were in charge of an orthographic drawing of the building to ease the burden. I was in charge of the section. We have to hand drawn it and also has to be in scale. We were required to provide sample materials too. 

And the attached would be the outcome of our board:

The front page of our presentation board. Consists of the architect and building information. Also, the section, plan and elevation as well as a brief introduction on the materials used.

The back page of our presentation board. Consists mainly on the information of the materials used in the building. 

Reflection
It was a fun and yet an ice-breaking project. Allowing us to bond among the group members and also being able to do work together as well. It was an interesting project where we get to know more about building materials and other more interesting facts and informations that we never knew before. Besides, it is also fun looking for buildings which consists the following criteria as we are able to have discussions on selecting a certain building that we all agree on. Overall, time wasn't a problem for us, we have our group meetings every week to catch up on everyone's progress and we managed to finish in time.